Thursday, April 30, 2015

New Blog!

If you are here, then that means I was actually able to figure out how to properly re-direct you from my old blog site.  Welcome welcome to my new blog "It's Maggie Made"!

This switch has been a long time coming and I finally took the plunge.   A whole new blog domain name and a new blog layout, but it's still me and I'll still be posting when I can about all my obsessive sewing projects.
Thank you dear reader (you know who you are Liz! =D) for making this switch with me! 


Monday, April 27, 2015

The Sew My Stash Bag Challenge

Since the beginning of the year, I have been making a serious effort to take part in the challenge that Leasa over at Project: Leasa put forth for us to be sewing from our own stashes for our projects.  I have actually been really enjoying it.  It's quite satisfying to put together a whole or most of a project simply from the fabric I have sitting on the shelf.  And even more satisfying is finding fabric that I had forgotten about and falling back in love with it all over again.
Anyways, for the month of April, Leasa issued another challenge to help keep us motivated.  The Sew My Stash 2015: Bag Challenge is a challenge to make a bag (larger than a zippy pouch) that is made 75% from stash and finished by the end of the month.  There was bonus for making a coordinating zippy for the bag. 
I saw this challenge come out right after the craft fair I had in early April.  I was a little burned out from all the crazy amounts of sewing I had been doing to prep for the craft fair, and this challenge was the perfect thing to help me get my sewing mojo going again.  Now I'm sure you are aware that just like any other crafter/sewing/maker out there, I have a "want to sew/make/do" list a mile long.  On that list is to make a pair of Cargo Duffel Bags for my boys for when me take road trips to go see either set of grandparents.  Well, I didn't really have time to make two duffel bags since I have an impending pile of little people birthday sewing calling my name, but I did have time to make one.  
 So, over the coarse of a few of days, I pulled out some of my toddler's favorite prints from my stash - mostly anything that has cars, fire trucks, trains, the color blue, and mustaches on it makes him happy.  Thankfully I had enough interfacing in my stash for this bag as well.  Oh and I had the zippers and snaps I need too - making this bag made from 100% of my stash! 
Since it's my second time making this bag (I made one as an overnight bag when I had the baby last spring), it made making this bag a little easier and also I knew what modifications I wanted to make to the bag.  I ended up using Soft and Stable to interface the main body of the bag which gave it great shape without being stiff.  I cheat when using Soft and Stable - I use quilting spray baste to baste the fabric onto the Soft and Stable making it then a breeze to work with.  I also added 2 inches to the zipper/bottom gusset of the bag making it 2 inches wider.  On the back panel, I inserted a zipper that went the length of the panel.  I then added a secondary panel to the back panel creating a large pocket for holding story books.  The last change that I made to the pattern for the bag was to add a "lining" fabric to the back side of each of the main bag pieces.  Thus when bag pieces were quilted and all sewn together, it looks like the inside has a lining even though it technically doesn't. 
 I really do like making this bag because its a very straightforward bag pattern that is easily tweaked to customize the bag as desired.  The only part that made me want to throw the bag across the room was the last step where binding is used to finish off the raw edges on the inside of the bag, but I pushed through and finished it! 
There were a few scraps left over which I ended up using to make a toiletry zipper bag, a toothbrush pouch and a drawstring bag.  Looks like the toddler has everything he needs for a sleepover trip to grandma's house - which he keeps asking me about almost every day..."are we going to grandma's house now?"

Saturday, April 25, 2015

About Turning 30

So my husband who usually doesn't even pay his birthdays any attention was a little unsettled by his birthday this year.  Because he was turning 30 years old.  Ach - that sounded so old to us when we met in college 10 years ago, and now it still almost feels like we are just starting to get this life things figured out.
 Anyways, I wanted to make the day special for him even though I was under strict instructions not to throw a party.  So I decided to come up with 30 presents I would give him that would convey to him how much me and our two boys love him and how awesome we think he is. 
 I managed to buy quite a few things that would make him smile or were things he needed but wouldn't buy himself.  I also cheated with a couple of  "coupons" thrown into the pile.  But in between all the other sewing I've been doing over the past few months, I did managed to sneak in a few things that I sewed up just for Tim such as the BigFoot doll, a Dumpling pouch, a Box Pouch, an Open Wide Zippered Pouch, and a couple of nesting little boxes (totally made up based off of what fabric scraps I had left and what stiff interfacing I could scrounge up from my stash). 
I ended up wrapping all of his gifts in brown craft paper and washi tape.  On each gift, I wrote him a little note that went along with what the gift was that expressed what a great guy he is.  On his birthday, we ended up having a nice quiet evening home with our two boys opening gifts, eating cheesecake and enjoying the new 30 year old in the house.  :)

Friday, April 24, 2015

Buzz Buzz - April

I must admit, one of the best sewing community things I've become involved with this year has been the sewing bee for #thebeehivequilts.  I love the community I have with these women, and I really am looking forward to each month getting a chance to make my small contribution to this fantastic group of women.  
For April, Melissa got to be the queen bee and pick a quilt block and color scheme for us to all work on.  She picked the Star Plus block as her block, and she requested that we do a navy boarder, white background and either an aqua or pink center star.  Another fantastic choice by a queen bee!!
Even though I was just a few days away from a Craft Fair, I decided that I need to clear my head and got to work on Melissa's block. I raided my stash, pulled out some hoarded prints and got to work.
 Since I had all ready made this quilt block in February for the February Queen Bee, I actually found it quite easy to put together this time around.  I was really happy with how it turned out and kind of wished I could have kept it.  Since I couldn't do that, I decided to use some of the left over fabric to make myself a smaller version of the 1 Hour Basket.
It ended up being the perfect size to set next to my sewing machine to hold some thread, my pin cushion, scissors and other sewing accessory odds and ends in a vain attempt to keep sharp pointy things contained and out of reach of Mr. Grabby McGrabHands (aka baby).
Wanting to add in a few little extras to make the Queen Bee feel special, I decided to make a little English Paper Piecing starter set.  I have a 1" hexagon paper punch (from Joann's on Black Friday sale) which is perfect for making a pile of EPP papers in a hurry.  Digging through my box of 2.5" square scraps, I even managed to pull out a respectable rainbow of squares just begging to be turned into cute little hexagons.   And for a finishing touch, an itty bitty drawstring bag to hold everything.
Buzz Buzz

Wednesday, April 22, 2015

Cabin Fever Spring Craft Market

Geepers, I can't believe that I've completely fallen off the grid on my blog for the last month or so.  Sometimes life is pretty boring, and sometimes life gets kind of crazy busy.  Crazy busy has been the story around here since mid-March.  And when life gets busy, this blog gets the short end of things.  So the biggest news is that we are buying a house and all the crazy that goes along with that!  Also, my husband's 30th birthday was here in mid-April, and I have a niece, nephew and son who all have birthdays between now and the end of May.  Lots and lots of birthday presents needing to be made!  Oh, and the weekend after Easter, I had a booth at a craft fair at Bayview Wesleyan Church in Traverse City. 
Last fall, I was part of the fall craft fair at the same venue and it considered it a success.  When the spring craft fair was announced, I decided to do it.  My sewing machine went into overdrive.
I ended up making 10 more Dolls and Daydreams Teddy Bears.
I designed my own bunny lovies and made three of them for the craft fair. 
 My toddler insisted I make him and baby each their own so they did get their own for Easter. 
Kelly of Kelbysews recently came out with a free pattern called the 1 Hour Basket.  It's a super cute fabric basket that's a little addictive to sew together.  I put together four of those for the craft fair also. 
 
 In an effort to start cleaning out my sewing space and get ready for a move, I pulled out a box that had some hidden WIPs in it such as this cute little drawstring bag (pattern by Jeni Baker of In Color Order).  The bag was all ready cut out and needed only a few minutes to get sewn together. 
 In that pile of WIPs, I also found eight of these medium Open Wide Zippered pouches (Pattern by Anna Graham of Noodle-Head) that were all ready all sewn together - they just needed the zipper end pulls attached to them.  A few minutes of sewing time and I had these ready to go too. 
 
 Remember the cute little Bigfoot I made for my husband?  yup, I decided to go ahead and use up what fluffy fabric I had left and made 5 more in time for the craft fair as well. 
 I needed to throw in a little easy sewing in the mad flurry of prep for the craft fair, so I put together a whole pile of fresh burp cloths and two more mustache baby blankets to add into the mix. 
 Oh yeah, I forgot to add that in the midst of all the craziness, my in-laws ended up coming out for a visit during my mother-in-law's spring break from school.  (It actually ended up working out well because they helped watch the boys while we had a few meetings with the realtor)  Needing some handwork to keep my fidgety fingers busy, I pulled out enough fabric from my scrap bin to start piecing together 2 large and 3 small pentagon patchwork play balls (tutorial by Abby Glassenberg of While She Naps).  I was able to finish one before the craft fair. 
I got the pentagons basted for the rest of the balls, and I took them with me to the craft fair.  I ended up finishing 3 of them during the down time the few times it was slow.  
 
 Phew!  I'm just tired from typing up everything I worked on for the Craft Fair!  But it was worth it.  The Craft Fair ended up being pretty successful and I made some good contacts for a few different craft fairs this coming fall.  What didn't well at the craft fair, is listed in my Etsy shop.
Hopefully, I'll keep posting when I can, just as I'm hoping to keep sewing as I can.  I'll try not to be a stranger ;)


Thursday, March 19, 2015

New Diaper Bag

At the end of February I had made a Tudor Bag based off of Sew Sweetness's pattern.  I've been using it everywhere I went since then.  I really wanted to use it as a diaper bag and if it's just a short errand out, I can fit what I need into it for the kids.  But I realized I needed something a bit bigger to fit everything I need for both kids for the days we are out longer.  Instead of looking for another bag pattern, I decided to make another Tudor Bag to use as a diaper bag and just add 2 inches to the width and length of it to make it big enough for what I needed. 
I had a half yard of this Forest Friendzy Forest Friends in Navy by Greta Lynn for Kanvas in my stash.  I love this print and wish I had gotten more than the 1/2 yard I did.  I pulled it out of my stash along with a few other choices for the diaper bag, and after showing the choices to my husband, this was the one he picked.  I'm glad he did.  After cutting out the panels for the outside of the bag, I had this little green hedgehog left over, perfectly cut to the size needed for the zipper tab.
I ended up having to get creative in my use of fabric for the bag since I didn't have any really big cuts of coordinating fabrics to work with.  But I like how it turned out.  It's fun and definitely a kid's bag, but I'm really happy with how it turned out.  I especially like that I took a little extra time to quilt the outside fabric onto the Soft 'n Stable interfacing.  It's such a great quilty texture to the outside of the bag.
I ended up add in some elastic topped pockets to the ends on the inside of the bag to hold things like sippy cups and bottles.  But otherwise, I kept the construction of the bag pretty close to the original pattern and pretty simple. 

The size of this bag is perfect!  I've all ready used it a couple of times and it holds EVERYTHING and there is still room left over!  And yes, the above photo is the entire contents that I typically have stuffed into this bag - two wet bags, a change of clothes for the toddler and for the baby, a container of puffs, a sippy cup, a bottle, formula, diapers, wipes, toys for both kids, lovie, burp cloth, crayons, hand sanitizer, candy and snacks, pacifier, pacifier/toy leashes, baby powder, diaper garbage bags, and my wallet!  Damn....kids require so much crap. 
But see - enough room for everything.  I could probably get a baby blanket in there as well if I needed to.  Best parts - its super comfortable to carry every loaded up with all that stuff.  And my husband is willing to carry it around since it has a moose on it.

Wednesday, March 18, 2015

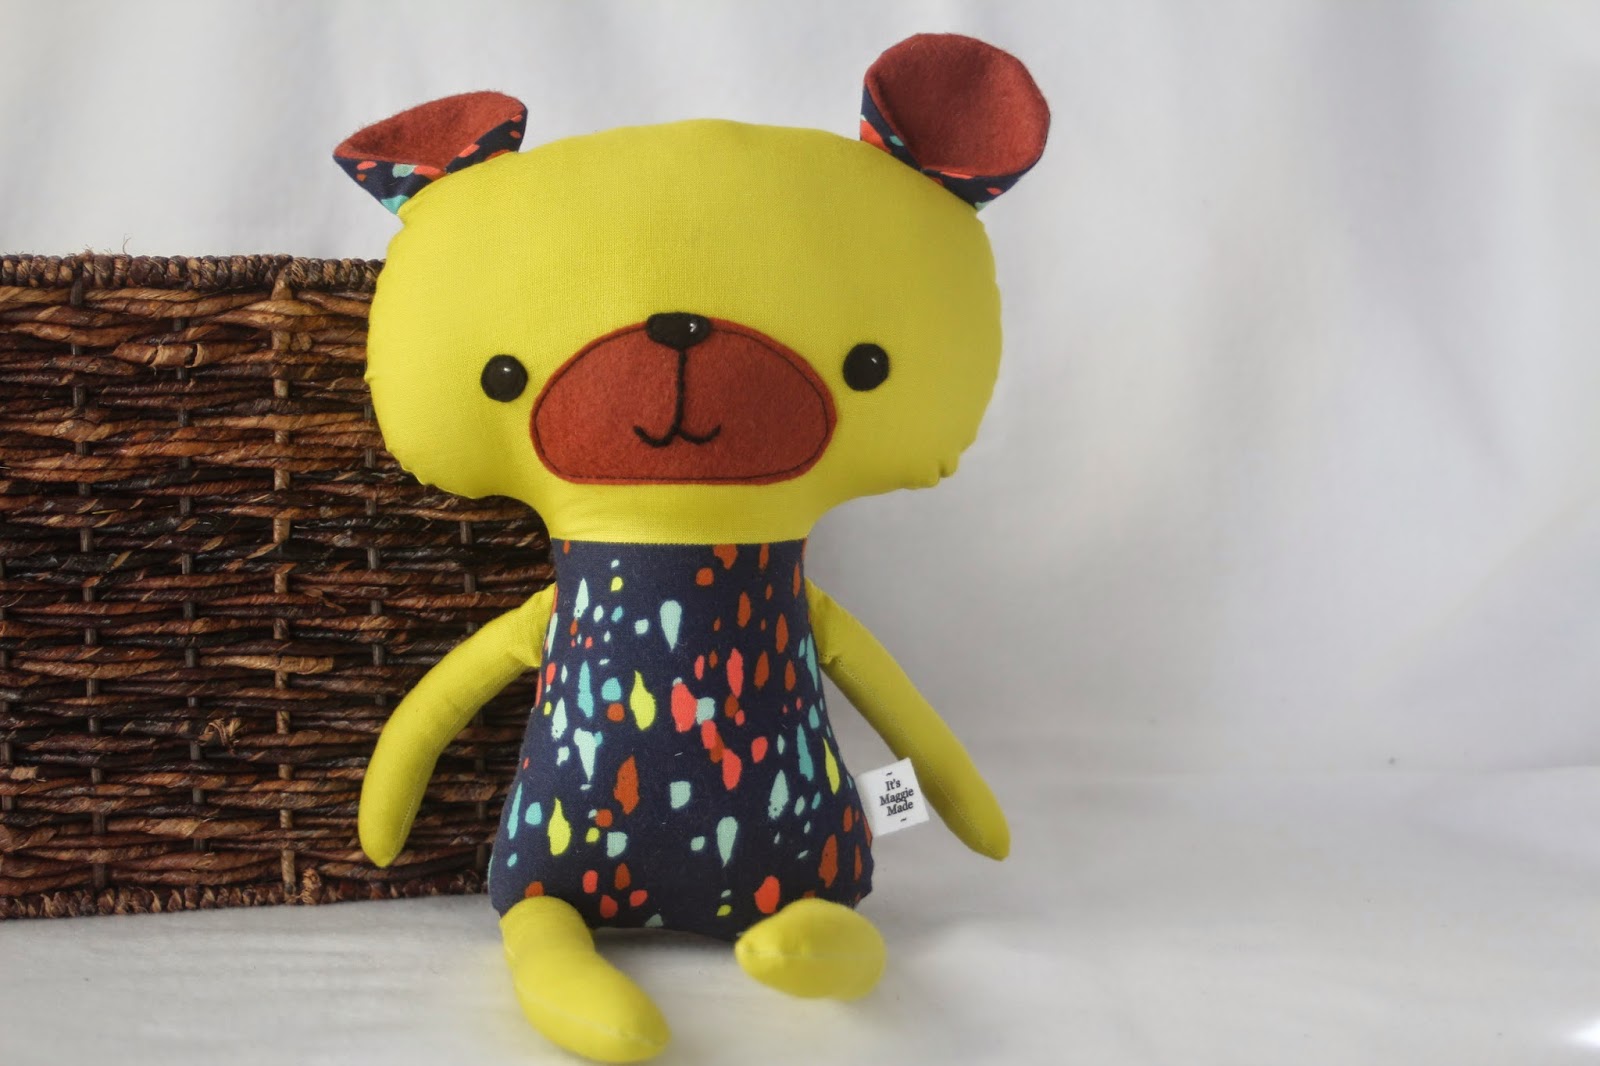
Teddy Bear

 For Christmas, my husband bought me this Teddy Bear pattern from Dolls and Daydreams.  It's been on my list to make for quite a while, but there always seems to be something else more important to make.  Well, last Thursday, I needed a break from what I was working on and decided to pull out this pattern and give it a go.  
 I pulled out some Cotton & Steel August Stampede in Navy that I had in my stash and pared it with some Kona Wasabi which matched the yellow/green colors in the Cotton & Steel fabric perfectly!  I also had some brown felt in my stash that nicely complimented the Cotton & Steel fabric as well. 
 The pattern was very well written and easy to follow.  I started cutting out the teddy bear Thursday during the boys' nap time and finished it Friday.  I LOVE how the bear turned out - the way the colors work together is just perfect!
 I listed this bear in my Etsy shop Friday afternoon, and within 30 minutes of listing this bear, he had all ready been snatched up!  Not going to lie - it was a little bit of a confidence booster to have him purchased so quickly.  Especially since I know the person who bought him, and she is someone who I highly respect in the quilting/sewing community.  Her sense of color use and design have been a huge inspiration to me and has encouraged me to try new things in unexpected ways in my sewing and quilting.  He couldn't be going to a better home. :)
 Also, I finally go around to using some grosgrain ribbon I received as a Christmas gift to make myself some label tags to use on the things I make to sell.  This teddy bear ended up being the first thing I've ever put my name on to sell.  It felt so good!