Thursday, March 19, 2015

New Diaper Bag

At the end of February I had made a Tudor Bag based off of Sew Sweetness's pattern.  I've been using it everywhere I went since then.  I really wanted to use it as a diaper bag and if it's just a short errand out, I can fit what I need into it for the kids.  But I realized I needed something a bit bigger to fit everything I need for both kids for the days we are out longer.  Instead of looking for another bag pattern, I decided to make another Tudor Bag to use as a diaper bag and just add 2 inches to the width and length of it to make it big enough for what I needed. 
I had a half yard of this Forest Friendzy Forest Friends in Navy by Greta Lynn for Kanvas in my stash.  I love this print and wish I had gotten more than the 1/2 yard I did.  I pulled it out of my stash along with a few other choices for the diaper bag, and after showing the choices to my husband, this was the one he picked.  I'm glad he did.  After cutting out the panels for the outside of the bag, I had this little green hedgehog left over, perfectly cut to the size needed for the zipper tab.
I ended up having to get creative in my use of fabric for the bag since I didn't have any really big cuts of coordinating fabrics to work with.  But I like how it turned out.  It's fun and definitely a kid's bag, but I'm really happy with how it turned out.  I especially like that I took a little extra time to quilt the outside fabric onto the Soft 'n Stable interfacing.  It's such a great quilty texture to the outside of the bag.
I ended up add in some elastic topped pockets to the ends on the inside of the bag to hold things like sippy cups and bottles.  But otherwise, I kept the construction of the bag pretty close to the original pattern and pretty simple. 

The size of this bag is perfect!  I've all ready used it a couple of times and it holds EVERYTHING and there is still room left over!  And yes, the above photo is the entire contents that I typically have stuffed into this bag - two wet bags, a change of clothes for the toddler and for the baby, a container of puffs, a sippy cup, a bottle, formula, diapers, wipes, toys for both kids, lovie, burp cloth, crayons, hand sanitizer, candy and snacks, pacifier, pacifier/toy leashes, baby powder, diaper garbage bags, and my wallet!  Damn....kids require so much crap. 
But see - enough room for everything.  I could probably get a baby blanket in there as well if I needed to.  Best parts - its super comfortable to carry every loaded up with all that stuff.  And my husband is willing to carry it around since it has a moose on it.

Wednesday, March 18, 2015

Teddy Bear

 For Christmas, my husband bought me this Teddy Bear pattern from Dolls and Daydreams.  It's been on my list to make for quite a while, but there always seems to be something else more important to make.  Well, last Thursday, I needed a break from what I was working on and decided to pull out this pattern and give it a go.  
 I pulled out some Cotton & Steel August Stampede in Navy that I had in my stash and pared it with some Kona Wasabi which matched the yellow/green colors in the Cotton & Steel fabric perfectly!  I also had some brown felt in my stash that nicely complimented the Cotton & Steel fabric as well. 
 The pattern was very well written and easy to follow.  I started cutting out the teddy bear Thursday during the boys' nap time and finished it Friday.  I LOVE how the bear turned out - the way the colors work together is just perfect!
 I listed this bear in my Etsy shop Friday afternoon, and within 30 minutes of listing this bear, he had all ready been snatched up!  Not going to lie - it was a little bit of a confidence booster to have him purchased so quickly.  Especially since I know the person who bought him, and she is someone who I highly respect in the quilting/sewing community.  Her sense of color use and design have been a huge inspiration to me and has encouraged me to try new things in unexpected ways in my sewing and quilting.  He couldn't be going to a better home. :)
 Also, I finally go around to using some grosgrain ribbon I received as a Christmas gift to make myself some label tags to use on the things I make to sell.  This teddy bear ended up being the first thing I've ever put my name on to sell.  It felt so good!

Tuesday, March 17, 2015

Bigfoot

There are some things that honestly would normally hold very little fascination for me....But, because I'm married to my dear sweet and sometimes odd husband, I've slowly become at least amused by a few things that my husband finds fascinating.  Big Foot, Sasquatch, Yeti, the Michigan Dogman....yeah, I don't get the fascination.  But my husband is fascinated (thankfully, not to a fanatical level), and it's possible that over the years some of his fascination has rubbed off a little.
Anyways, I found this fuzzy brown fabric in the Joann's remnant bin for a song and decided to play around with making a Bigfoot for my husband's upcoming birthday.
I kind of winged it as I went, using some previous softie making and my imagination as a guide.  During one of the boys' nap times, I whipped this little guy together using the brown fuzzy fabric, and some felt and poly-fil I had on hand.
He actually turned out pretty darn cute - although I'm not sure Bigfoot is supposed to be cute.  hehe

Monday, March 16, 2015

Quilty Comfort

Warning - content isn't exactly the normal happy fluff that usually posted on here.  The following is a story which I've rarely shared because I don't often like sharing in such a public way the rough and ugly of my life (of which I have my fair share I can assure you).  But it's for a good cause - I promise.
 Our oldest son is always keeping me on my toes, and he certainly has thrown a lot of surprises at us since the very beginning.  Some great and amazing moments that I wouldn't trade for anything, and some pretty scary moments that would terrify any parent.  Probably the scariest thing we had to go through with him was shortly after he turned a year old and just a week before Christmas.  My mom was watching him for the day because he was teething and he had a high enough fever where he couldn't go to day care.  Right around naptime, his fever spiked really high and he had a febral seizure.  Freaked us all out quite a bit.  Between the super high fever and the fact that he had had seizures before, we ended up taking him to the local children's hospital where he was admitted and kept overnight for tests and observation.
Thankfully, all the tests pointed to it being a febral seizure which he would outgrow with age.  And thankfully, since this incident, he hasn't had any more seizures.  Even though the end result was good, it was still a pretty stressful and scary situation which I hope to never repeat. However, thanks to the kindness of strangers, the whole thing was made a little more bearable.  After a round of tests, we came back to the room to find that several gifts has been left for our son from items donated to the hospital - some toys, a puzzle, and a stuffed dog.  It was a much needed distraction for our little man and really helped to releave some of the stress we were under.  Oddly enough, the stuffed dog became a cherished lovie and went everywhere with our son for a long time afterwards.
 Anyways.... That whole story has some relevance to what I've been working on lately.  I never forgot the kindness our son was shown during his hospital stay, and I've always wanted to find a way to sort of pay the kindness forward.  This past summer, I fell in love with an "I Spy" quilt I made for my boys out of charms squares I had been collecting.  Loving the quilt so much, I raided the novelty print section at Joann's and bought enough 1/4 yard cuts off novelty print fabric to make some "I Spy" quilts for my Etsy shop.  Well.... From those 1/4 yard cuts, I cut out enough squares to make 4 half-square triangle and 6+ square "I Spy" quilts.  Way more than I could reasonably sell in my shop!
 Three of those quilts were made and given away as gifts, one was made and sold at a craft fair in November, three more were made and are listed for sale in my Etsy shop, leaving me enough squares left over to make 3 more quilts.
At first, I wasn't sure what I would do with 3 more "I Spy"quilts, but then I heard/saw several people talking about and posting on blogs and Instagram about making charity quilts, and then the local quilt guild which I recently joined decided to have a goal this year of making and donating 100 quilts to charity.  Ahhah!  So, in between other projects when I needed something simple to work on, I've been working on turning the pile of squares into three quilts.  I finished the quilts up last week and I'll take them with me to the next quilt guild meeting to give to the lady in charge of making sure the charity quilts end up where they are supposed to go.
I also cleaned out the pile of quilts I had in my closet and pulled a few out of my Etsy shop that weren't selling to donate as well.  This stack of 8 baby and kid sized throw quilts will end up going to Munson Medical Center's Pediatric and NICU units.  I pray that they can provide some small amount of comfort to a child and family going through a crappy situation. 

Wednesday, March 11, 2015

Dumplings


So I am have stumbled upon a new zippered small bag making obsession.  I've been seeing bags called Dumpling Pouches popping up on Instagram - actually, there are whole swaps devoted to making theme related dumpling pouches and swapping them with other participants.  Anyways, they are super cute and something that has been on my never ending to-make list for a while.  I made my first one for the March queen bee of the quilting bee I'm in.  
Lets just say that the dumpling pouch turned out even cuter in person that what it looks in photos.  The next day, I decided to make a four more.
This one is made from the scraps left over from the Cotton & Steel Tudor Bag I made.  It's the perfect size to hold an EPP project that I can throw in my bag and take around with me. 
This one is for my Spring Fling Mini Quilt swap partner.  She says she likes Tula Pink and I loved having a chance to cut into this Tula Pink Moonshine print called "Forest Frivolity in Sky".  Tula really is the queen of making fabric made for fussy cutting.
This one was made from Black Yarn Dyed Essex Linen on the outside with a dark red zipper.  I love how the red pops on the Essex Linen.  I lined this one with red fabric that coordinates with the zipper.  It was made as a gift for my husband's Aunt's 80th birthday.  Hopefully she will like it.
And I made one more that's rather super hero themed for my husband's upcoming 30th birthday.  Thankfully, he doesn't read this blog so I'm not ruining the surprise.  :)
I definitely see more of these little cuties in my future.

Tuesday, March 10, 2015

Teeny Tiny Flying Geese

 Foundation paper piecing is addicting. 
Teeny tiny foundation paper pieced flying geese - even more addicting.
I Love the look of paper pieced flying geese, and Kelly Liddle of Jeli Quilts has definitely played a part in my obsession with tiny paper pieced flying geese.  If you want to know what I mean, just check out her blog or her Instagram feed to see what I mean.  She is a master at the teeny tiny paper pieced flying geese.
Making tiny flying geese has been on my to-make list for a while, and I finally had a good excuse to get around to making some - I needed to make a name tag to wear for when I attend the local quilt guild meeting.  So, I pulled the smallest flying geese template from Kelly's Goose Dash quilt pattern and then shrunk it.  I think I printed it as 80%, and I added some width to all sides of the flying geese in order to make the name tag the right side.  Added a little embroidery for my name, lightly quilted it and tada - a nice little quilted name tag.
The ladies at the quilt guild were impressed with the tiny geese - always nice to impress ladies who have been sewing/quilting probably longer than I've even been around for. 
Oh yeah - and as much as I am loving my new found skills in paper piecing, I still can't get over that making a little 4"x6" paper pieced name tag can produce this large of a pile in trimming:

Wednesday, March 4, 2015

Buzz Buzz - March

March 2nd - Bam!  The bee block for March was done, extra goodies made and selected, everything all packaged up, and on its way to Queen Bee Michael Ann (she can be found at michaelannmade although she is more active on Instagram)!  Honestly, I doubt that this success rate will continue, but for now, I'll enjoy the smugness of getting it done so early in the month! 
When the Wanta Fanta Block for the #thebeehivequilts was released on February 23rd, I fell in love with the block!  It looked like a lot of fun to put together, plus the repeating pattern that multiple block put together produced was fantastic! So, imagine how excited I was when Queen Bee Michael Ann pick it for her bee block.  And then she went and picked one of my favorite color combinations - blue, green and violet for the main part of the block and low volumes for the background.  And she wanted it all to be scrappy looking.  Perfect!!
 I was so excited by my fabric pull that I jumped right into making the block.  It's a paper pieced block, but once I had everything cut out, the block went together pretty quickly since the units could be chained pieced together.  
 And done!  Love love love it.  I can hardly wait to see what the other ladies in my swarm come up with and how they will all look together. 
When making the two snowball units for this block, I ended up with these eight 1.5" (un-finished) half square triangle units.  They were just too cute not to do something with.  
 I've seen different versions of the Dumpling Pouch pop up over on Instagram and this seemed like the perfect chance to give it a try. 
 So I pieced together the half square triangles.  Pieced together two different faces for a Dumpling pouch.  Lightly quilted it onto Fusible Fleece. 
Pulled a zipper out of my zipper stash, and tada - this little cutie was born!
Not perfect by any stretch of the imagination, but still adorable.
I pulled a few other fun things together to send along with the block including the dumpling I just made.  I also added in a stack of fabric that I didn't want anymore that Michael Ann said she could use for a charity quilt she is putting together (she is making a second block each month so at the end of the 12 months, she will have enough blocks to make a sampler quilt for charity). 
And just like that, by March 2nd everything was in the mail.  Yay!  She got it today and loved it!  Humble worker bee can't ask for better than that. :)

A Little Bit of EPP

Since discovering English Paper Piecing a few months ago, I love having some EPP projects on hand to be puttering with in between bigger projects or to take with me when I attend the local quilt guild meetings.  After seeing Nicole of Modern Handcraft post on Instagram about the fantastic storage container she found at Target to hold her EPP work, well...I had to get one too. 
 I love it!  Its perfect to hold all of my EPP supplies and a few small projects all at once.  It closes tightly so I don't have to worry about little fingers getting into it, and it travels well too. 
Here are a few of the EPP Projects I've done over the last month or so.  This first one I made from scraps left over from making my February Bee Block.  It's made with 3/4" hexagons so it's a bit teeny to work with.  I sent it along with some other goodies to the Queen Bee for February.  
 And because these hexi pin cushions are a bit addicting to make, I decided to make a couple out of Priory Square fabric.  These two were a bit bigger - I think made out of 1.5" and 1" hexagons.  I made the bigger one for a friend but then I didn't like how big it turned out so I ended up making the second smaller one.  I've yet to catch up with my friend to see which size she wants.  I swear that every time I work with Priory Square fabric doing EPP, it's like the fabric was designed with EPP in mind - the fussy cutting that comes from it, is just perfect. 
 I fell in love with the combination of these two Cotton + Steel prints when making my Tudor Bag.  I decided to make a hexagon pin cushion caddy based off of a tutorial I had seen on Valerie Rigney's Instagram feed. Well.... It was one of those projects that for some reason, I didn't read the directions right and by the time I realized that, it was a challenge to correct my mistake and salvage the project.  
 I thought I had salvaged the project, but then after stuffing it, I just couldn't get the inside of the caddy to work and the shape overall to look right.  
 So, I cut it all apart!  Decided it was better to rip it apart and turn it into something else than to try to live with a project that I didn't love.  ;)
 Since there had been two of the caddies cut out, I turned them both into two larger hexagon pin cushions.  One for me, and one for my Spring Fling Mini Quilt Swap partner.  For all of these pin cushions, I've been raiding an old jar of buttons that used to belong to my husband's grandmother.  I love being able to pull out something old to add to something new. 
 Here is a size comparison between a 1.5" hexagon pin cushion and a 3/4" hexagon pin cushion. 
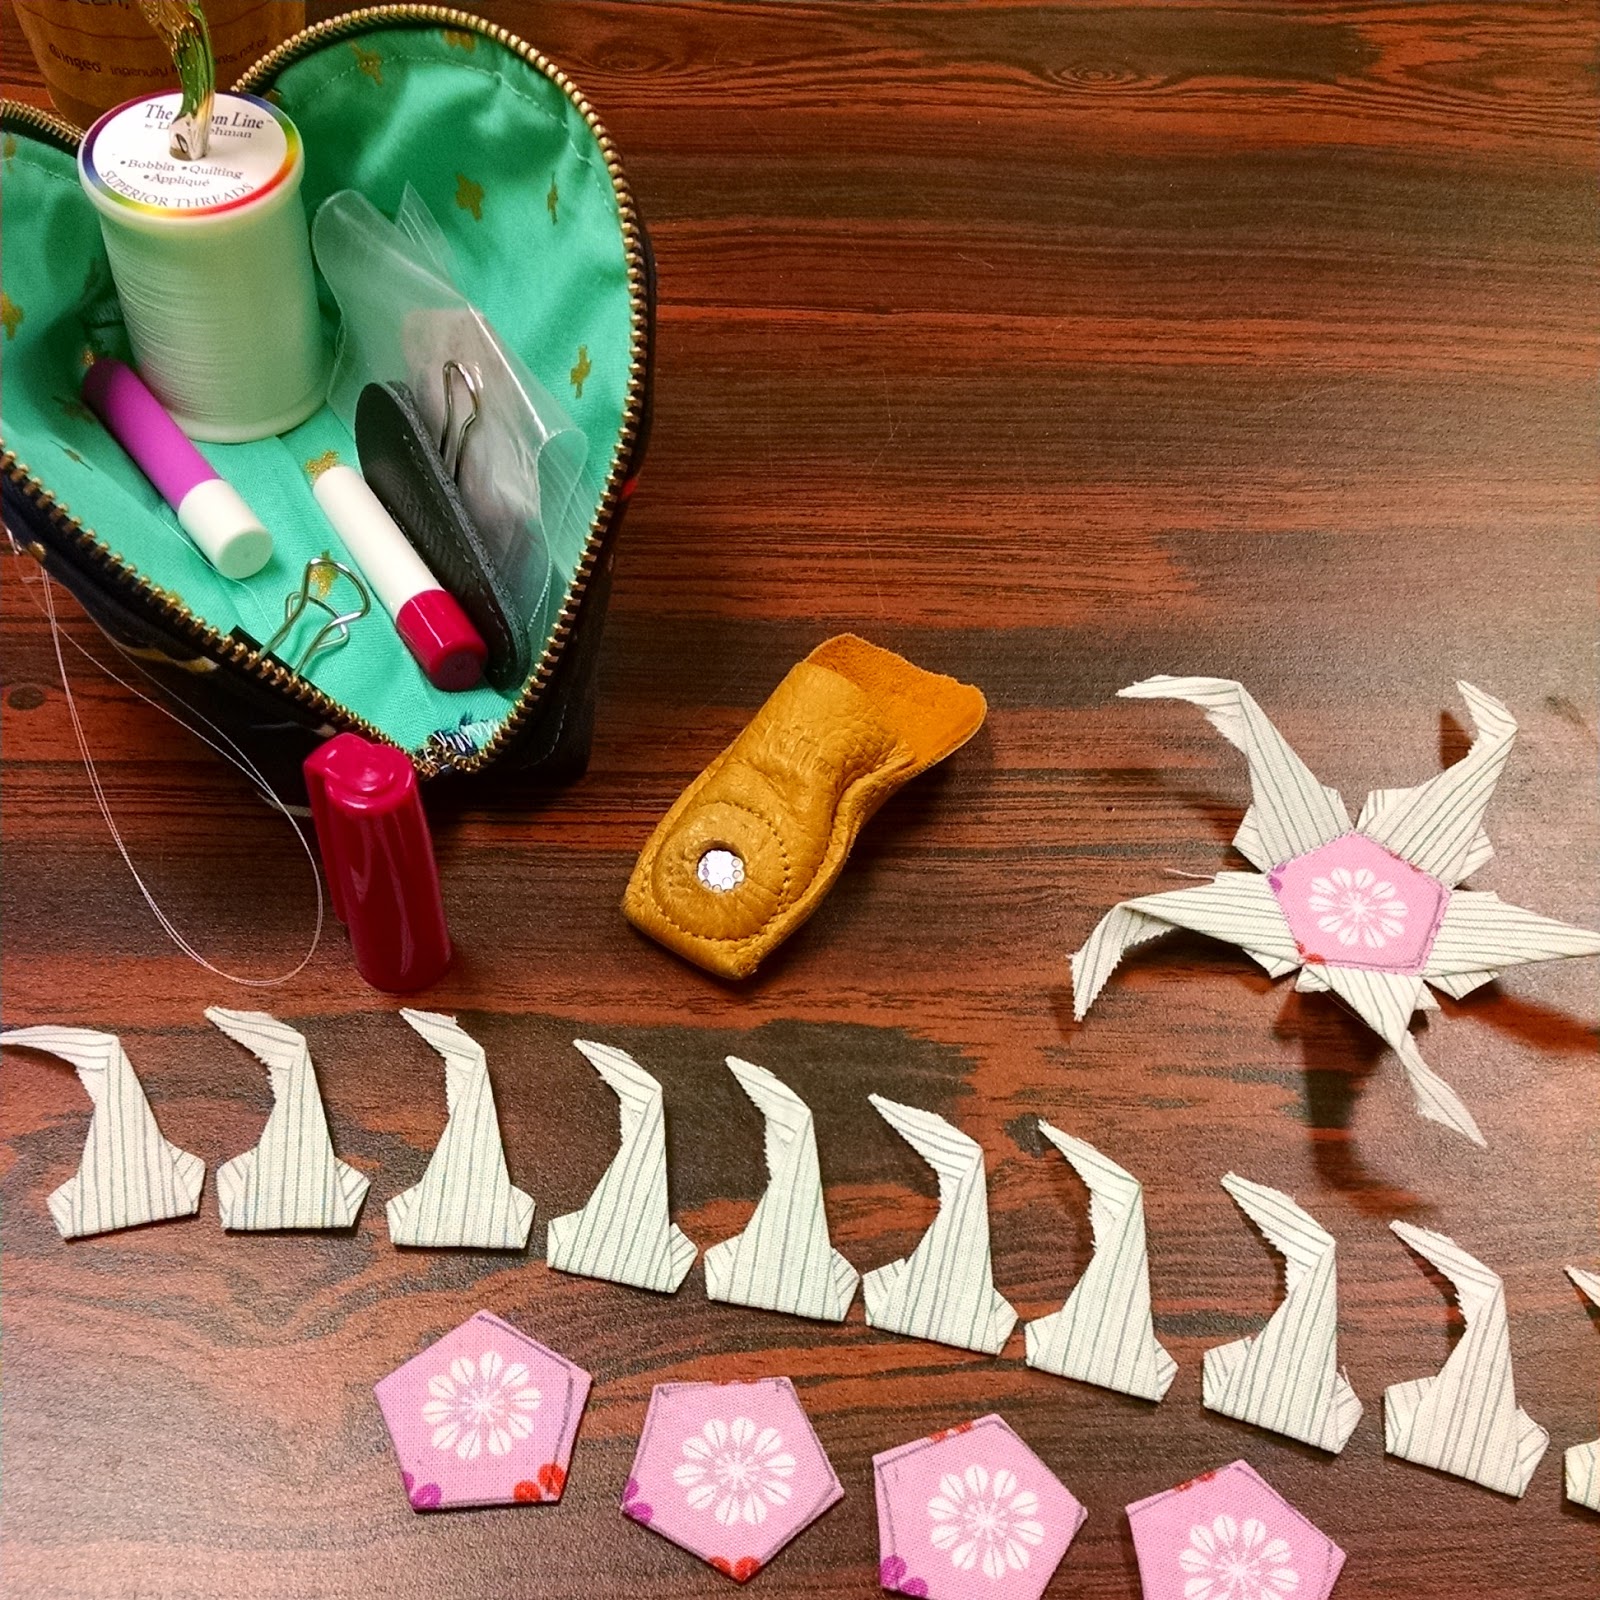
And lastly, I've been working on making another La Passacaglia Mini Quilt.  When I had originally cut out the La Passacaglia mini quilt that I made for the Schnitzel & Boo Mini Quilt Swap back in December, I had cut a second cog out.  But as the mini progressed, I changed plans a bit and didn't need the second cog.  Since I loved how the original turned out so much, I decided to put together the abandoned cog wheal for myself.  It's slow going and I usually only pull it out when I go to the local quilt guild meetings which equates to only a couple hours worth of work on it per months.  But maybe, eventually, I'll get a La Passacaglia quilt that I can keep for myself. 
Here I'm working on making some star units.  You can see the start of the center of the cog in the first picture at the top of this post.