Saturday, February 28, 2015

My Splurge Project....

So, I have a confession.  I did not stick to the Sew My Stash 2015 challenge when I made this bag. 
 
I couldn't help it though!  I have been dieing to make myself a new larger sized tote bag for shlepping around all the kiddo's stuff and after being so good for the last two months about barely buying any fabric and producing a lot of projects only from my stash, I decided I needed a splurge project.
Sara over at Sew Sweetness released her Tudor Bag pattern back in November and it's been on the top of my wish list when it comes to bags.  So I splurged. I bought her pattern, bought some fancy bronze purse hardware into JoAnn's, got a couple of metal zippers from Zipit (THE best place to get zippers - seriously!  With their amazing prices and super fast shipping - I refuse to buy my zippers anywhere else!), a little bit of interfacing, and two yards of some Cotton & Steel Metallic XOXO fabric (surprisingly found at my local quilt shop which carries a smattering of Cotton & Steel in the middle of their very traditional fabric selection). 
To be fair though, I had enough of the Cotton & Steel Mustang Metallic Arrows in Navy, Kona Navy, and most of the interfacing I needed for the bag.  (I know....I'm trying desperately to justify this one). 
A note about the pattern.  I actually had the chance to meet Sara in person and take a bag making class from her last March at Camp Stitchalot.  Sara is a brilliant bag designer and I learned so much from her about interfacing for bags and bag making tips in general.  Her patterns are definitely my go to pattern when I'm looking for a bag that has a great shape to it and some stiff body to it.  She has great step-by-step photos to go along with her well written directions.  She also has some great tips throughout the pattern about how to use the interfacing the pattern calls for.  All that to say that I highly recommend her patterns to any sewer.   
I worked on this bag off and on for 4 days before I finished it up.  Although, if I hadn't had to wait for zippers, get a little more of the XOXO fabric, and deal with a million kid and life interruptions, I could have probably gotten this done a lot quicker. 
Final conclusion - this bag was a perfect splurge project.  I used some fabric I've long been drooling over and I got a beautiful bag out of it! 
I'm pretty sure it's a big enough bag to hold my kiddos crap I have to shlepp around for most of our outings.  And most importantly, it's big enough to hold my English Paper Piecing travel case!!  hehe

Friday, February 27, 2015

A Prickle of Rainbow Hedgehogs

 
 Oh, Hazel, you have been one of those quilts that I've fallen in love with since the moment I saw you because of your fun quirky personality.  And now I've finally made a Hazel Hedghog quilt and I love Hazel all the more. 
Angie of Gnome Angel has been hosting a quilt along for the Hazel Hedgehog pattern for the month of February.  This was precisely the excuse I need to pull out my copy of the Hazel Hedgehog pattern by Elizabeth Hartman that I had purchase a few months ago and actually put it to good use. 
Trying to stick with the  
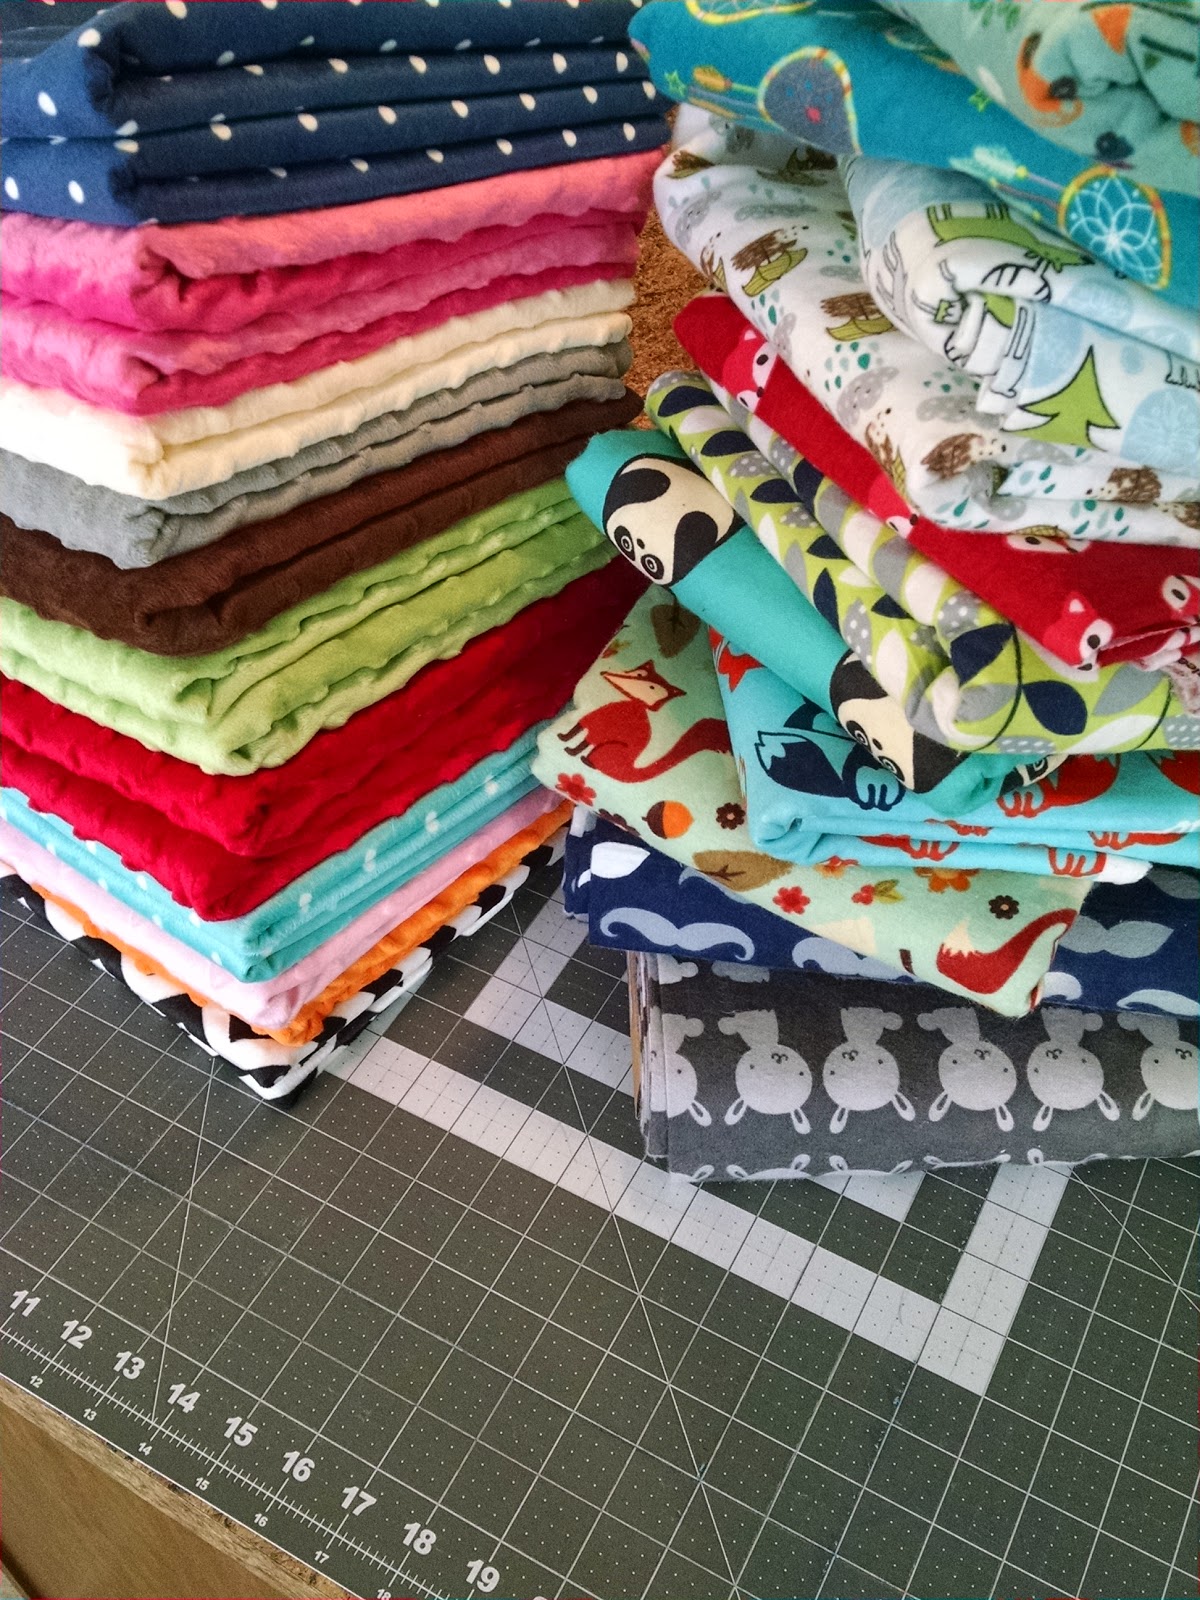
Sew My Stash 2015 challenge and wanting to do something fun, bright and quirky as befitting Hazel's personality, I decided to dig into my stash and pull fabric that I could use to give Hazel some rainbow spines! 
 I love the pull I was able to make from my stash and I even pulled a few pieces from my scrap basket too.  I had some light gray crasshatch type fabric that I loved for the background of the quilt as it gives it some subtle texture without detracting from the rainbow spikes.  Unfortunately, I only had 1 yard and the pattern calls for 1 1/4 yards of background fabric for the baby sized quilt.  I decided to go ahead and cut out what I could so I could get started.  And to my great delight, I discovered that if I was really smart about how I cut out the background fabric, I was able to just barely eek out exactly what I needed from a yard of fabric with only a few tiny scraps left over!!  
 Although I had a few other sewing projects that were more pressing at the start of February, I couldn't help myself but sew together at least one Hazel before I put this quilt away until later in February. 
 She turned out better than I had pictured!!  It was so hard to put this one away for a couple of weeks, but prime motivation to get my other projects sewn and out of the way!
 Once I picked back up this quilt, I decided to batch assemble the rest of the hedgehogs.  I felt it went much smoother to assemble all of the block at the same time instead of one at a time mainly because there are so many small yet different pieces so it was easy to sew on all of each type of piece before moving onto the next piece needed to make the block. 
 I ended up staying up far too late one night assembling all the blocks into a quilt top.  Totally worth it though!!  After I got the top done, I ended up being without my sewing machine for a few days as it was serviced and had some minor repairs done on it.  Perfect timing to hunt through my stash to find a backing and binding for it.  I ended up pulling out a black and white chevron minky fabric of which I had just enough for a backing.  And my just enough, I mean that there was only 1 inch to spare on the top and bottom! 
Not feeling super confident in my free motion quilting skills yet, I decided to go with a simple diamond grid patten on this quilt.  I love the texture it adds.
For the binding, I had trouble deciding what I wanted to use that would perfectly compliment the quilt.  After going back and forth on a few different options, I decided to go with a scrappy rainbow binding using some of the same prints I had used to make some of the spikes on Hazel. 
 Don't you just love the look of binding all pressed and ready to go onto a quilt?  I know I do. 
 And here she is all done!  Finished size, its about 36" by 40" - a perfect baby quilt size.  And I was pretty happy that by making myself really look at what I had on hand, I was able to produce such a cute, fun and quirky baby quilt 100% from my stash.  And I'm so glad I went with a scrappy rainbow binding!  Definitely a binding choice I think I'll use again in the future.  
 A completely unplanned but happy accident is how amazing the rainbow binding looks on the back of the quilt!  Its almost squeal worthy. 
Naturally, a hedgehog quilt deserves to be photographed in the woods.  The day that I had a chance to go get some photos while my husband watched the kids was actually one of the warmest days we had had in a while and since then.  It was a beautiful day for a walk in the woods - super fluffy snow on the ground and big flakes coming down from the sky.  The lighting wasn't as good as I would  have liked, but still - it was pretty. 

Toddler Messenger Bag

I love 3 year olds!  They are the best! (and sometimes the worst too ;)) 
This week I've been working on making a new tote bag for myself and my 3 year old asked me so sweetly if I could make a bag for him too.  How can I say no?
So I pulled out a handful of novelty print fabric from my stash that I thought he would like.  He of coarse picked the puppies!  He stipulated that the bag have puppies and blue on the outside and mustaches on the inside.  (if you hear how he says mustache - you would die from cuteness overload!)
Just the other day, I say Miggy from This Little Miggy Stayed Home blog post a tutorial on how to make a toddler messenger bag.  I knew this bag would be perfect for the bag my 3 year old wanted me to make him.  The tutorial was pretty easy to follow along with.  I made a few minor adjustments to the pattern - I added a light weight interfacing to the outside fabric to give the bag a little big of body, and I made the strap a little differently.  It was a pretty quick sew too.  It took me most of the morning to make it from pulling the fabric, cutting everything out and sewing it all together.  I probably could have gotten it done sooner if I wasn't chasing two kiddos around! 
End result - Bear had a finished Messenger Bag right before lunch time.
 He wasted no time and stuffed it full of toys and treasures so he could go on adventures with it! ;) 
 And as an added bonus, I was able to made a little open wide zipper pouch from the little bit of puppy fabric I had left over.  
Oh, and everything for the messenger bag and the pouch was from my stash!  Hurray for another  Sew My Stash 2015 project! 
Linking up with Crazy Mom Quilts for Finish It Up Friday!

Saturday, February 21, 2015

Sails Mini Quilt

 
There are some patterns that come along that are just so beautiful and intriguing that they stick in your head and find a spot on the never shrinking wish list of things to make.  Well, the "Sails" paper piecing pattern by Daisy at Ants to Sugar was one of those patterns.  She first made her version back in September and I fell in love with it, yet I never had a good excuse to make myself one.  Well, I finally had an excuse to make one.  My mom's birthday is coming up, and she loves the cardinal place mats I made her for Christmas, but she wanted some more place mats that she could use when it wasn't Christmas or winter.  When she doesn't have all of her winter/Christmas decorations up, she decorates part of her house with lighthouses and nautical stuff.   When I started thinking about what to make her that would match her decor, instantly I thought of Daisy's "Sails" pattern.
I'm still sticking with the Sew My Stash 2015 challenge, so I dug through my stash and pulled out some fabric I like for the pattern, printed out the pattern and got to work.   
As you can see, I changed a bit of my initial fabric pull when I got to the water and boat part of the pattern and I'm glad I decided to make the change. 
I LOVE how this turned out.  Daisy's pattern is well written and although a bit time consuming, it was easy to follow and put the pieces together.  I especially love the way in which the sails are constructed because they have so much movement in them - you can almost see the wind pushing the sails out.
Well, anyways, at this point, as much as I love how this was turning out, it didn't quite look like my mom and I decided to go with something else for her which I think she will love.  Plus, I was crazy in love with this little mini quilt and part of me didn't want to let it go.  I quilted it up when I quilted the other place mats for my mom with a dense diamond grid pattern on it which just added so much great texture to this mini quilt.  
 So, I have this large canning jar that I though any left over/extra binding scraps into.  Since, this was just a mini quilt, I decided to poke around in my binding scrap jar to see if I had something long enough that would go with this mini quilt.  And I just so happened to have exactly enough dark brown binding for this mini.  The brown binding is perfect for this mini since I think it gives it a nice "framed" look.  
 I braved the sub-zero weather the other day to snag a few quick photos of it outside while the sun was actually shining.  It was COLD!  But these pictures are so worth it. 


Friday, February 20, 2015

A Few Small Finishes

 I'm linking up with Amanda over at Crazy Mom Quilts for Finish It Up Friday today.  I have a couple of small finishes to show although they aren't my only finishes from the week but I'll post about my quilty finishes later once I get a chance to properly photograph everything.  
My first finish is a stack of note cards that I put together earlier this week on a day I was without my sewing machine.  My machine had to go into the shop to be serviced and have a minor repair done, so I was desperate to be doing anything crafty with fabric.  I had a pile of little triangles that I had trimmed off my Hazel the Hedgehog quilt I was working on and decided to actually put them to good use (especially since I was desperate - serious fabric addict over here!).  And this the result of a morning spent gluing fabric scraps onto blank cards in between chasing two kiddos around. 
 I can see some possible future quilt designs on these cards.  And now I have some scrap happy cards to pull from!  (oh and Thank you Amanda for the inspiration!)
Oh, as a note - I used an Elmer's glue stick to stick the fabric scraps onto the card stock since I didn't have my sewing machine when I was making these.  I seems to hold the fabric on securely enough without wrinkling the paper. 
And for my other non-quilty finish this week - I put together this set of four monogrammed open wide zippered pouches.  I used my go-to pattern for zippered pouches by Anna over at Noodlehead blog.  I added an inch in each direction to the smallest size and appliqued the letters onto the front of each bag before I sewed them all together. 
A cute set of pouches for four cute little sisters. 

Sunday, February 15, 2015

Wandering Geese

This morning I braved the -12 degree weather outside and the knee deep snow to snap a few pictures of my latest finish of two wandering flying geese place mats.  I made them for my mom's upcoming birthday in two weeks.  Hopefully she will like them - her and my tastes vary quite a bit.  However, she loves it when I send her something handmade and she does like blue, so the odds of her liking them are pretty good. 
I've been a long time admirer of the flying geese quilt design.  It's such a traditional yet modern design that has endless possibilities.  Well, I had never actually made any flying geese.  They were one of those things that always seemed to be on my want to do / want to learn list, yet I just never got around to making any flying geese.  The other day, while scrolling through Pinterest, I stumbled upon a paper pieced flying geese pattern that I really really really liked.  Also, I realized my mom's birthday was quickly approaching and decided to give this pattern a try. 
It took a little while to decide on colors for the geese and the background especially since I am really trying to stick with the Sew My Stash 2015 and really look through my stash to find something that will work for a project instead of just going out and buying new fabric for every new project.  This challenge might seem a little restrictive, but actually, I've been enjoying it because it has allowed me to really take a good look at what I have, what fabrics I tend to actually use (thus get a better idea of what fabrics to buy in the future), and it has forced me to use fabrics that otherwise I would just hoard because I love them so much.  After combing through my stash for a while, I finally found fabrics that would not only work for this project, but I loved how they played together.  These place mats ended up being made 100% percent from fabrics, batting, and thread I had in my stash!
For the flying geese, I settled on a selection of six aqua and white prints and went with a Carolyn Friedlander print from her Botanics line for the background (this is one of those much hoarded prints but it felt so good to use it and see it in action).  I really love how the flying geese just pop on the charcoal gray background. 
I new that since these would be used as place mats by my mom, I wanted to do a really dense quilting on them.  I had recently see a few people on Instagram do a dense diamond grid straight line quilting pattern and I decided to go with that.  The lines are about a 1/4 inch apart so even those these place mats measure at 16"x20" finished, the quilting ate through a lot of thread.  I was so glad that I had found two spools left over from my Fair Isle quilt that matched the background perfectly - hurray!  I do love though how the dense quilting gives these such great texture without taking away from the boldness of the flying geese. The blue bird print I used for the backing on the place mats is left over from some sewing projects I did last spring.  I knew my mom would like it because I had made her an zipper poach out of it which she uses every day in her purse.
 I so love how these turned out - especially the happy accident of these two owl peaking out of the flying geese. 
Happy Birthday Mom!  I hope you know how much I love you because these place mats are gorgeous and would look great on my table too! :)

Thursday, February 12, 2015

Buzz Buzz - February

Super proud of myself - its only the second week in February and I've all ready gotten my #thebeehivequilts bee block for February done, extras put together, everything packaged up, mailed out, and received by Queen Bee Megan (you can find her over at Sew Stitching Cute).  

 I am so so glad that I signed up for this quilting bee if for no other reason than for the fact that I have been assigned to the sweetest, coolest, most generous group of quilters ever! It has been so much fun all ready getting to know these ladies.  Plus, Queen Bee Megan has been such a fabulously chill and fun queen bee.  She let us have pretty free reign on the colors we picked for her bee block.  She really likes green and bold prints so I had fun digging through my stash to find some often overlooked fabric to put together this block for her.  To thank her for being such a great Queen Bee, I wanted to put together a few extras for her including a small hexi pincushion for her (which she loved!):
 And a few other goodies (she likes frogs to those frog post its were a must when I saw them while grocery shopping last week): 
 I can't wait to see what the rest of the year holds for my swarm mates! :)

Wednesday, February 11, 2015

Pile of Softness

A week ago, I had this pile of deliciously soft minky and flannel fabric sitting on my cutting counter staring at me - begging me to be turned into a pile of deliciously soft baby blankets.  Well, actually this pile of softness has been sitting in a heap in my craft closet since I went a little crazy during Joann's Black Friday and Christmas sales....But anyways, it was time to finally give this pile of plush cuteness some attention. 
Well, I may or may not have gotten sidetracked by a few other projects (which I'll go into in another blog post) including this pile of pacifier clips/leashes for my Etsy shop. 
Anyways, I managed to regain enough focus between Friday and Monday to actually get that pile of softness turned into baby blankets.  
 There are so many beautiful baby blankets in that pile!  I'm refraining from claiming any of these for my boys since I all ready have several of these type of blankets that I use daily for them.  But really aren't these the cutest? 
I love how they all turned out!  Yesterday morning, I had a chance to properly photograph all these baby blankets plus the pile of pacifier clips/leashes.  Of coarse my boys wanted to "help":
 And make sure that I get a good photo of Superman:

 And be ridiculously cute yet uncooperative baby blanket models: 
 During their nap time yesterday afternoon, I listed everything in my Etsy shop. The baby blanket section and the pacifier clip/leash section were both looking a little spars after Christmas, so it was good to get some new stock into my shop. 
Not necessarily the most glamorous sewing, but it pays for this crazy obsessive hobby of mine.  Plus, I get a weird thrill out of figuring out quicker ways to mass assemble a product while still maintaining my high standard of quality in the things I sew and sell.  Ehhh - gotta get my kicks and giggles somehow, right? ;)